Background
This is meant as a quick-start to connect an existing Kubernetes cluster with GitLab for use with Auto DevOps. The intended audience includes those who are new to GitLab as well as people migrating from the deprecated certificate-based integration.
Pre-requisites and assumptions
- Existing Kubernetes Cluster where you will be able to install the GitLab Agent for Kubernetes
- Although the following steps should work on both GitLab self-managed and GitLab.com, I have only tested them on GitLab.com
Overview
We will be using three projects for this walkthrough.
- A project for the agent configuration
- A Cluster Management Project
- A project where Auto DevOps will be enabled
Steps
- Navigate to the Subgroup where you will create the three projects. Ex. https://gitlab.com/edmond-demo
- From the left menu, select
Kubernetes, then check that the Subgroup does not have access to a certificate-based cluster connection. -
Create a project for the Kubernetes Agent. Ex. https://gitlab.com/edmond-demo/kubernetes-agent
- Decide on an agent name, and create an empty file in your project under
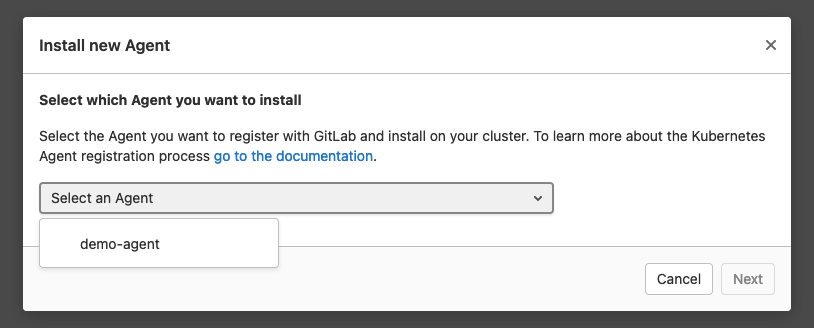
.gitlab/agents/<your agent name>/config.yaml.The extension must beyamland notyml! I called my agentec-agent, so the file is under.gitlab/agents/ec-agent/config.yaml - Once the configuration file is in place, visit
Infrastructure/Kubernetesand add a new cluster using the Agent. A dialog will pop up where you can select your agent:
- Once you hit “next,” you will see the registration token and a
dockercommand for easy installation. Thedockercommand includes the token too and you can run it to quickly set up anagentkinside of your cluster. - Open a shell in your cluster and run the docker command from the previous step.
- Check that cluster syncronization is working. We will deploy a
ConfigMapto test the setup. Createkubernetes/test_config.yamlwith the following content:
apiVersion: v1 kind: ConfigMap metadata: name: agent-test namespace: gitlab-agent data: key: It works!- Modify your Agent configuration file under
.gitlab/demo-agent/config.yaml, and add the following to it:
gitops:
  # Manifest projects are watched by the agent. Whenever a project changes,
  # GitLab deploys the changes using the agent.
  manifest_projects:
  - id: edmond-demo/sandbox/kubernetes-agent
  #- id: path/to/your/project
    default_namespace: gitlab-agent
    # Paths inside of the repository to scan for manifest files.
    # Directories with names starting with a dot are ignored.
    paths:
    - glob: '/kubernetes/*.yaml'
    # - glob: '/kubernetes/**/*.yaml'

# The CI/CD tunnel is always enabled in the project where you register and configure the Agent.
# This connection can be shared with other groups and projects.
ci_access:
  # projects:
  # - id: path/to/project
  groups:
  - id: edmond-demo/sandbox
  # - id: path/to/group that is a parent to the agent configuration project
Once you commit the above changes, GitLab notifies
agentkabout the changed files. First,agentkupdates its configuration; second, it retrieves theConfigMap.Wait a few seconds, and run
kubectl --namespace gitlab-agent describe configmap agent-testto check that the changes got appliedd to your cluster. You should see something similar:Name: agent-test Namespace: gitlab-agent Labels: <none> Annotations: config.k8s.io/owning-inventory: 502-28431043 Data ==== key: ---- It works! Events: <none> - Decide on an agent name, and create an empty file in your project under
-
Create a project for the Cluster Management Project using the “Cluster Management Project” template. Open the create new project from template page, search for “GitLab Cluster Management”, and start a new project with that template.
You will receive a project that already contains quite a lot of things! It comes with a ready-made
.gitlab-ci.ymlfile and helmfile based setup for 11 applications that integrate with various GitLab functionalities. Each application might require different configurations. You can read about these in the linked documentation.We will install NGINX Ingress and cert-manager using the cluster management project.
- Install NGINX Ingress - In your cluster management project, edit
helmfile.yamland uncomment the line that points to theingressapplication. Commit the changes to install. - Install cert-manager - Next, edit
helmfile.yamland uncomment the line that points to thecert-managerapplication. Commit the changes to install.
- Install NGINX Ingress - In your cluster management project, edit
-
Set group level environment variables
Variable Value KUBE_CONTEXT<path to agent>:<agent-name>(ex. edmond-demo/kubernetes-agent:ec-agent)KUBE_INGRESS_BASE_DOMAIN<cluster IP address>.nip.ioI used
kubectl get service --all-namespacesto get the external-ip address of my ingress controller. - Import your favorite Auto DevOps repo into the group you shared your CI/CD tunnel with and let the magic begin.
Resources that I borrowed heavilly from for this short writeup
(Thank you Viktor Nagy)